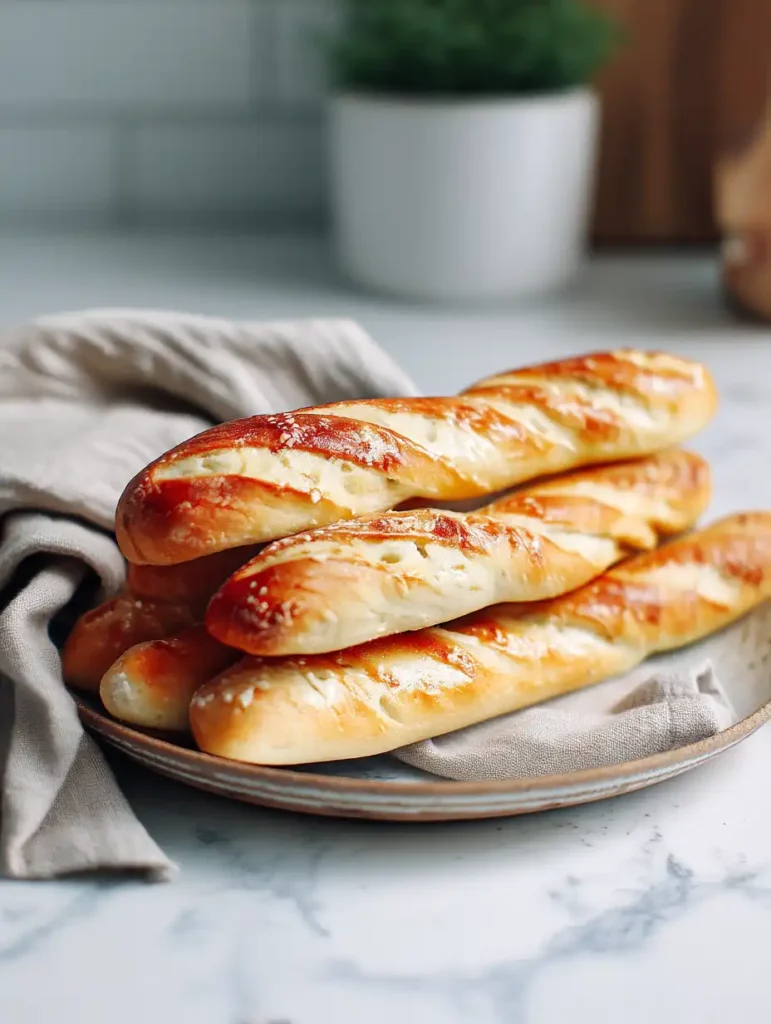
Whether it’s for a cozy family dinner or a last-minute appetizer, there’s something irresistible about warm, buttery sourdough breadsticks fresh from the oven. This article will guide you step-by-step on how to make same day sourdough breadsticks that are light, flavorful, and golden brown all without the need for an overnight ferment. We’ll also tackle common beginner mistakes, teach you how to store them properly, and explain how you can successfully use your sourdough starter the same day it’s fed. Let’s bring bakery-level breadsticks into your home kitchen today.
The Magic Behind Same Day Sourdough Breadsticks
Why This Recipe Works So Well Same Day
I’ll never forget the first time I made breadsticks using sourdough. I was rushing to host a dinner for friends and realized too late I hadn’t started my dough the night before. Out of sheer desperation, I used freshly fed sourdough starter and crossed my fingers. To my surprise, they turned out tender, chewy, and better than most restaurant versions. That’s when I realized: with the right ratios, method, and a touch of patience, same day sourdough breadsticks aren’t just possible they’re phenomenal.
The secret lies in using an active sourdough starter at its peak, just a few hours after feeding. It’s bubbly, warm, and packed with wild yeast power. Combined with a long knead and a warm proofing spot, this dough transforms in just a few hours. No compromise on flavor, and you still get that beautiful sourdough tang.
This same-day magic is something I first explored when baking sourdough discard cinnamon rolls. I was blown away by how much fermentation flavor you could develop in just a few hours with the right balance of timing and temperature.
A Quick Look at What Makes Sourdough Dough Unique
Unlike instant yeast, sourdough relies on wild, naturally occurring yeast and beneficial bacteria. This results in deeper flavor, better texture, and longer shelf life. But sourdough behaves differently it’s stickier, slower to rise, and more sensitive to temperature.
That’s why we don’t just throw it into a recipe like any other yeast. In this recipe, you’ll notice we give the dough time to rise twice once for bulk fermentation, and once for final shaping. This ensures those breadsticks don’t turn out flat or dense.
For new bakers wondering, “Why are my sourdough breadsticks flat?” it’s often due to under-proofing or not developing enough gluten. We solve both here with a combination of warm proofing and a thorough windowpane test. This hands-on approach guarantees a pillowy interior and golden crust.
And yes, these freeze like a dream. But honestly? They rarely last that long in our house.
Step-by-Step Guide to Perfect Same Day Sourdough Breadsticks
Mixing the Dough: Texture Is Everything
Start by gathering your ingredients: bread flour, water, salt, sugar or honey, an active sourdough starter, and softened butter. You’ll want your sourdough starter bubbly and active fed 4–6 hours prior and ideally doubling in volume before use. This ensures enough strength to raise the dough the same day.
In your stand mixer, add the water, sourdough starter, salt, sugar or honey, and bread flour. Begin mixing on low for 5 minutes using the dough hook. This builds structure early without overdeveloping the gluten.
Once incorporated, add the softened butter in small chunks. It might seem greasy and sticky at first, but be patient. Knead for 10–15 minutes until the dough turns smooth and elastic. Perform the windowpane test by gently stretching a piece if it forms a translucent sheet without tearing, you’re set. This step is non-negotiable for fluffy breadsticks.
Avoid adding extra flour. The dough should be tacky but not unmanageable. Trust the process your mixer does most of the work here.
Much like our approach with sourdough cottage cheese bagels, thorough kneading is key to building strength and rise.
Proofing & Shaping: Light Hands, Big Results
After kneading, cover the dough and let it rise in a warm place (around 80°F) for 3–4 hours until doubled in size. A sunny window or a closed oven with the light on works great.
Once risen, gently punch down the dough and turn it out onto a clean surface—no flour needed. Divide into 12 equal portions using a bench scraper (each around 63 grams if you want precision). Roll each piece into an 8-inch rope between your hands or on the counter.
Place the shaped breadsticks evenly spaced on a lined baking sheet (half sheet pans work best). Cover again with a clean towel and allow them to rise for 2–3 more hours until puffy and airy.
During this second rise, your kitchen should smell subtly sour and warm always a good sign. Don’t rush this step; this final proof is the difference between flat and fantastic.
Once they’ve risen fully, bake in a 400°F oven for 20–22 minutes, rotating once if needed. They should come out golden with just a hint of crust on the outside and pillowy centers inside.
Want to keep your kitchen projects running smoothly? Try our proven methods in blueberry zucchini bread it’s all about gentle handling and smart timing.
Flavor Upgrades & Proper Storage for Sourdough Breadsticks
Irresistible Toppings That Make a Difference
Fresh out of the oven, these sourdough breadsticks are already delightful but brushing them with melted butter and a quick homemade seasoning mix takes them to the next level. Combine butter, garlic powder, and Italian seasoning for a classic finish. It soaks into the warm crust, giving each bite a savory boost.
Looking to personalize them? Try swapping Italian seasoning for dried oregano, basil, or rosemary. Add a touch of grated parmesan (optional, for dairy-friendly diets) after brushing with butter for extra richness. Just avoid overloading them with toppings before baking this can prevent proper browning and crisping.
Another fun idea is to brush them with olive oil instead of butter and sprinkle with za’atar or sesame seeds. These additions add global flair while still keeping with the same simple dough base.
If you love a little spice, a light dusting of crushed red pepper flakes post-bake gives a subtle kick. But no matter how you top them, remember hot breadsticks are best served warm, right out of the oven.
Storing Breadsticks to Keep Them Fresh
Sourdough breadsticks naturally last longer than typical yeast-based versions, thanks to their acidity. Once completely cooled, store them in an airtight container at room temperature for up to 3 days. For longer storage, freeze them in a sealed freezer bag no need to wrap each one individually.
To reheat, just pop them in a 325°F oven for 8–10 minutes. They’ll regain their crisp edges and soft interior without drying out. Avoid microwaving unless you wrap them in a damp paper towel it keeps them from going rubbery.
If you’ve ever wondered how to store sourdough breadsticks so they don’t go stale, these tips should solve that. Just remember: don’t refrigerate them. It speeds up staling and ruins that fluffy texture you worked hard for.

Using Fresh Starter & Avoiding Flat Sourdough Breadsticks
Can You Use Sourdough the Same Day You Feed It?
Absolutely and that’s the entire foundation of making same day sourdough breadsticks. A common misconception is that sourdough starter needs to be matured overnight before use, but that’s not always the case. When you feed your starter in the morning and it becomes bubbly, airy, and doubled in volume within 4–6 hours, it’s fully active and ready to raise dough.
In fact, using a fresh, well-fed starter during its peak fermentation window results in superior rise and flavor perfect for a same day recipe like this. It’s important to feed your starter with warm water and place it in a slightly warm spot (around 75–80°F) to speed up activity.
Many beginner bakers ask, “Can you use sourdough the same day you feed it?” The answer is a confident yes just make sure your starter passes the float test. Drop a teaspoon into water: if it floats, it’s ready for your same day sourdough breadsticks.
What Causes Flat or Dense Breadsticks?
If your same day sourdough breadsticks came out flat, gummy, or too dense, you’re not alone. There are a few common culprits:
- Under-kneading: Gluten development is crucial for structure. Skimp on kneading, and your dough won’t rise properly.
- Cool environment: If your kitchen is too cold, the dough won’t rise quickly or fully. Aim for warm proofing areas.
- Starter wasn’t at its peak: A weak or underfed starter leads to flat, slow dough. Make sure it’s bubbly and doubles consistently.
Another issue is shaping the breadsticks too tightly. Overworking them during shaping can deflate your dough right before baking. Keep the shaping gentle and resist the urge to stretch too aggressively.
To avoid these pitfalls, follow the windowpane test, use an active starter, and give the dough the full rising time. These three steps will always lead to tall, fluffy, same day sourdough breadsticks.
PrintSame Day Sourdough Breadsticks: Soft, Golden & Ready Fast

Soft, buttery, and chewy same day sourdough breadsticks made from an active starter. Perfectly golden with a savory topping, ready in just a few hours.
- Prep Time: 20 minutes
- Cook Time: 22 minutes
- Total Time: 6 hours
- Yield: 12 breadsticks 1x
- Category: Bread
- Method: Baked
- Cuisine: American
- Diet: Vegetarian
Ingredients
160 grams water, ⅔ cup + 1 Tablespoon
175 grams active sourdough starter, ¾ cup
10 grams salt, 1 Tablespoon
350 grams bread flour, 2 ½ cups
15 grams sugar or honey, 1 Tablespoon
57 grams butter, softened, 4 Tablespoons
Topping:
14 grams butter, 1 Tablespoon
½ teaspoon garlic powder
½ teaspoon Italian seasoning
Instructions
1. Add all of the dough ingredients, except the butter, to the bowl of a stand mixer and mix with the dough hook for 5 minutes.
2. Add the softened butter to the dough and knead for 10–15 minutes, or until it passes the windowpane test.
3. Cover and let the dough rise in a warm spot for 3–4 hours, or until doubled in size.
4. Punch down the dough and divide it into 12 equal pieces, about 63 grams each.
5. Roll each piece into a log about 7–8 inches long.
6. Place shaped breadsticks on lined baking sheets and let rise again for 2–3 hours.
7. Bake in a preheated 400°F oven for 20–22 minutes or until golden brown.
8. Mix melted butter with garlic powder and Italian seasoning, and brush over the warm breadsticks.
Notes
Make sure your sourdough starter is at peak activity bubbly and doubled before using.
Avoid adding more flour during kneading even if dough feels sticky at first.
Breadsticks can be frozen after baking and reheated in a 325°F oven.
Nutrition
- Serving Size: 1 breadstick
- Calories: 180
- Sugar: 2g
- Sodium: 340mg
- Fat: 6g
- Saturated Fat: 3g
- Unsaturated Fat: 2g
- Trans Fat: 0g
- Carbohydrates: 28g
- Fiber: 1g
- Protein: 4g
- Cholesterol: 15mg
FAQs
What is the biggest mistake beginners make with sourdough bread?
The most common mistake is not allowing enough time for fermentation and proofing. Rushing the rise or using an underfed starter can lead to dense or flat breadsticks. Another major issue is adding too much flour especially during kneading because sourdough dough is naturally sticky. Trust the process and resist overcorrecting the texture.
How do you store sourdough breadsticks?
After baking and cooling, place your sourdough breadsticks in an airtight container and store them at room temperature for up to 3 days. For longer storage, freeze them in a zip-top bag. To reheat, pop them in a 325°F oven until warm this brings back their crisp edges and fluffy centers.
Can you use sourdough the same day you feed it?
Yes! Using your sourdough starter 4–6 hours after feeding when it’s bubbly and at peak activity is perfect for same day sourdough breadsticks. Just ensure it passes the float test before mixing your dough.
Why are my sourdough breadsticks flat?
Flat breadsticks often result from under-kneading, a cold proofing environment, or a weak starter. Be sure to knead thoroughly (until the dough passes the windowpane test), proof in a warm spot, and only use a starter that’s fully active and bubbly.
Are sourdough breadsticks easier to digest than regular bread?
Yes, in many cases. According to Harvard’s Health, the fermentation process in sourdough helps break down gluten and phytic acid, which can make the bread easier to digest and improve nutrient absorption. While not gluten-free, many people find sourdough gentler on the stomach compared to commercially yeasted breads.
Conclusion
Making same day sourdough breadsticks might sound ambitious, but with the right starter, a warm kitchen, and just a little patience, it’s a game-changer. Whether you’re whipping them up for a family meal or just want a cozy weekend baking project, these breadsticks deliver on every front: soft, chewy centers, golden edges, and that unmistakable sourdough depth all in a single day.
No overnight waits. No yeast packets. Just simple ingredients, the power of sourdough, and a process that respects both tradition and your busy schedule.
So the next time you’re craving bakery-style breadsticks without the 24-hour prep, turn to this recipe. Your kitchen will smell amazing, and your table will never be short on warm, homemade love.


Leave a Reply