Introduction
Who says you need a big budget or advanced culinary skills to treat yourself to something truly delightful? When it comes to satisfying those sweet-and-salty cravings, chocolate covered chips might just be the ultimate snack. These crunchy, golden chips enveloped in a layer of smooth, melted chocolate perfectly balance rich sweetness with a hint of saltiness. The best part? You don’t have to be a master chef to pull it off this is a straightforward, easy recipe that anyone can enjoy creating at home.If you love sweet-and-salty treats, you might also enjoy our White Chocolate Pretzels for another crunchy delight.
In my experience, homemade versions of classic store-bought goodies always bring out an added layer of freshness and flavor. Plus, crafting these chips in your own kitchen means you can customize every step, from the type of chocolate you choose to any extra toppings or drizzles. Whether you’re aiming to impress guests at a gathering, looking for an eye-catching treat for a dessert table, or simply wanting to indulge in something new, chocolate covered chips can be a welcome, fuss-free addition to your repertoire.
In the sections that follow, we’ll explore everything you need to know from selecting the right chips and chocolate to mastering the dipping technique so you can create a restaurant-worthy snack that’ll disappear as quickly as you can plate it.
Ingredients & Tools
Choosing the right ingredients and having the proper tools on hand can make a world of difference when crafting your own chocolate covered chips. Below are the key factors to consider, from selecting the perfect potato chips to picking the ideal chocolate and ensuring you have the kitchen essentials to bring everything together smoothly.
Choosing the Best Chips
- Kettle-Cooked vs. Classic Thin-Cut
- Kettle-Cooked Chips: These often have a sturdier texture and a thicker cut, making them less prone to breakage during dipping. Their hearty crunch also contrasts well with the smooth chocolate coating.
- Classic Thin-Cut Chips: If you prefer a lighter crunch, go with a thinner potato chip. Keep in mind they can be more delicate, so handle them carefully to avoid crumbling during the chocolate-dipping process.
- Ridged Chips for Extra Support
- Textural Advantage: Ridged chips (like Ruffles) have grooves that hold onto chocolate, providing more surface area for flavor. They also tend to be thicker, helping them maintain shape once coated.
- Flavor Considerations: Any salty or lightly seasoned ridged chip can work, but opt for those without strong seasonings (e.g., barbecue or sour cream and onion) if you want a neutral base that won’t overpower the chocolate.
- Baked or Low-Sodium Options
- Health and Dietary Needs: For those seeking a lighter option, baked chips or reduced-sodium chips can reduce overall fat or salt intake without compromising too much on flavor.
- Taste Balance: Even with low-sodium chips, the sweet-and-salty contrast shines through thanks to the chocolate coating.
- Try a Twist: If you enjoy experimenting with different chip bases, you might also explore our Cottage Cheese Chips for a unique homemade alternative though these are typically enjoyed on their own, they can inspire new ideas for sweet-and-salty creations.
Which Chocolate to Use
- Milk, Dark, or White Chocolate
- Milk Chocolate: Creamy and sweet, milk chocolate pairs particularly well with salty chips if you’re after a more classic flavor.
- Dark Chocolate (Semi-Sweet or Bittersweet): Offers a richer, bolder taste and pairs excellently with the salty crunch. If you’re a serious chocolate lover, this may be the ideal pick.
- White Chocolate: Sweeter and milder in cocoa flavor, white chocolate creates a striking contrast to the golden chip color but can be more finicky when melting.
- Dairy-Free or Vegan Alternatives
- Plant-Based Chocolate: For those with dietary restrictions, plant-based chocolate bars or chips are widely available. Melt them similarly to regular chocolate for a vegan-friendly version of this treat.
- Texture & Flavor: Many dairy-free chocolates melt smoothly and taste nearly identical to their traditional counterparts just be sure to check the packaging for specific melting instructions.
- Quality Matters
- Ingredient Labels: Opt for chocolate with minimal additives or extra oils. Higher-quality chocolate often melts more smoothly and delivers a superior flavor.
- Cocoa Content: If you love a deep cocoa taste, look for a higher percentage of cocoa solids (e.g., 60–70% for bittersweet chocolate).
Essential Equipment
- Heating Tools
- Double Boiler (Bain-Marie): If you want more control over the melting process, a double boiler gently heats the chocolate, reducing the risk of scorching.
- Microwave-Safe Bowl: For a quicker melting method, simply microwave your chocolate in short bursts, stirring between each interval.
- Surface & Utensils
- Baking Sheet & Parchment Paper: After dipping, you’ll need a flat surface to let the chocolate set. Lining your baking sheet with parchment paper prevents sticking and simplifies cleanup.
- Heat-Resistant Spatula or Spoon: These come in handy for stirring melted chocolate and guiding excess chocolate off each chip. A silicone spatula is ideal for scraping the sides of the bowl.
- Optional Extras
- Toppings Station: If you plan to add finishing touches like sea salt flakes, crushed nuts, or sprinkles set them out in small bowls for quick and easy application.
- Cooling Rack or Fridge Space: Chips need time to harden once coated in chocolate. Ensure you have enough space in your fridge (especially in warmer climates) to speed up the cooling process.
Having fresh, high-quality chips and chocolate on hand, along with the right tools for melting and setting, lays the foundation for crafting a delicious batch of chocolate covered chips. Once you’ve assembled these essentials, you’re ready to move on to the fun part dipping, decorating, and enjoying your homemade sweet-and-salty masterpiece!
How to Make Chocolate Covered Chips
Chocolate covered chips are a classic example of the irresistible sweet-and-salty combination. With just a few steps, you can quickly transform everyday potato chips into a gourmet-style treat. Below, we’ll break down the process into easy-to-follow segments to help you achieve that perfect blend of crunchy chips and decadent chocolate.
Step 1: Prepping the Chips & Chocolate
- Gather & Warm Your Ingredients
- Room-Temperature Chips: Pull your chips out of the bag and arrange them in a single layer if possible. Cold chips can cause uneven chocolate setting, so allowing them to reach room temperature ensures a smoother coating.
- Chop Chocolate Evenly: If you’re using chocolate bars (milk, dark, or dairy-free), slice them into uniformly small pieces. This promotes faster, more consistent melting.
- Set Up Your Workstation
- Parchment-Lined Tray: Line a baking sheet or tray with parchment paper. This will be the surface where the dipped chips rest and cool.
- Double Boiler or Microwave: Decide which melting method you prefer. A double boiler offers slow, gentle heat, while a microwave is faster but requires cautious 20–30 second intervals of heating and stirring.
Chef’s Note:
In my experience, prepping all your ingredients and tools beforehand makes the dipping process smoother. If you’re multitasking or short on time, consider melting the chocolate first; it’s best to work with chocolate that’s freshly melted and at just the right consistency.
Step 2: Dipping & Setting
- Melt the Chocolate
- Double Boiler Method: Fill a saucepan with a couple of inches of water and bring it to a simmer. Place your chopped chocolate in a heatproof bowl resting on top. Stir gently until it’s smooth and glossy.
- Microwave Method: Heat the chocolate in short bursts, stirring after each interval. This prevents scorching, which can lead to a grainy texture.
- Dip the Chips
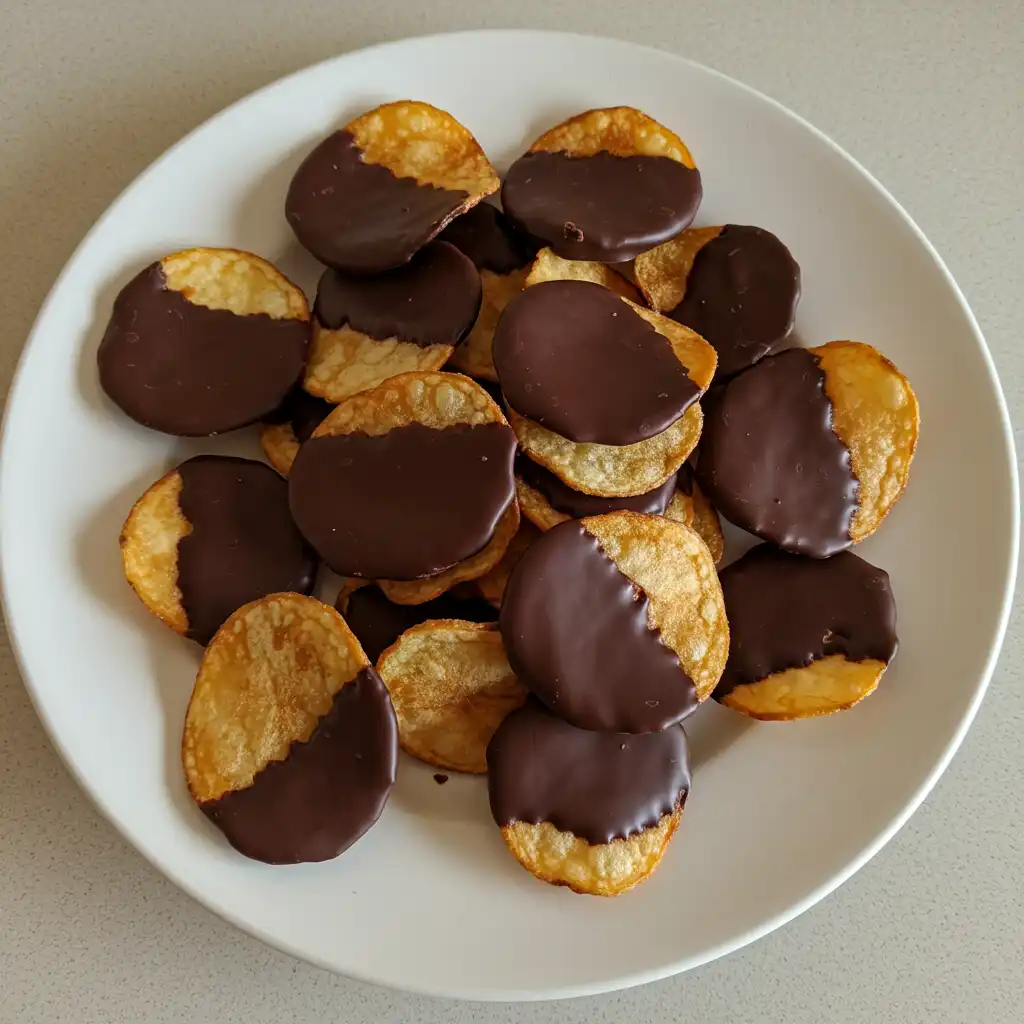
- Partial Coating: Hold a chip by one corner and dip it halfway or three-quarters into the chocolate. Leaving a bit of chip exposed not only looks appealing but also provides a spot for your fingers to grip.
- Shake Off Excess: Lightly tap the dipped chip against the side of the bowl to remove extra chocolate. This helps prevent thick, uneven coatings and speeds up the setting process.
- Allow to Cool
- Parchment Paper Placement: Carefully lay each dipped chip onto your parchment-lined tray. Keep them slightly spaced to avoid sticking together.
- Chill or Room-Temp Set: If your kitchen is warm, place the tray in the refrigerator for 10–15 minutes to let the chocolate harden. Otherwise, setting them out at room temperature will work fine, just more slowly.
Chef’s Note:
I’ve noticed that adding a spoonful of neutral oil (like coconut or vegetable oil) to the chocolate can help thin it slightly if it’s too thick. This step is optional but can make dipping easier and the final coating smoother.
Step 3: Avoiding Common Pitfalls
- Soggy Chips & Humidity
- Protect the Crunch: Make sure your chips are stored properly before you begin. Any moisture in the bag can lead to soggy results.
- Low-Humidity Environment: Try to dip your chips in a cool, dry area. If the environment is humid, consider turning on a fan or air conditioner to reduce moisture in the air.
- Overheating Chocolate
- Temperature Control: Chocolate seizes or burns quickly at high temperatures, so stir frequently and remove from heat once melted.
- Rescue Techniques: If your chocolate gets lumpy or grainy, sometimes you can salvage it by adding a small amount of neutral oil or warm milk (for a non-vegan version) and whisking vigorously.
- Messy or Uneven Coating
- Batch Work: Melt chocolate in smaller batches so it stays at the right temperature and consistency.
- Consistency Matters: Thinning chocolate with a bit of oil can help achieve a more uniform dip, leading to a smoother finish.
Chef’s Note:
Don’t be discouraged if a few chips break or if the chocolate consistency isn’t perfect on the first try. With a bit of practice and patience, you’ll quickly find the method that works best for your taste and kitchen setup.
Following these steps should give you the confidence to whip up a fresh batch of chocolate covered chips anytime. Once your chips are set, feel free to explore fun toppings or flavor twists from a sprinkle of sea salt flakes to a drizzle of white chocolate. In the next section, we’ll look at some popular ways to enhance and customize this simple yet decadent treat.
Flavor Variations & Toppings
One of the best things about chocolate covered chips is how easily you can customize them to suit your personal taste or dietary preferences. Below are a few creative ways to elevate your sweet-and-salty snack beyond the classic chocolate coating. Experiment with different textures, flavors, and decorative elements to make each batch unique.
Toppings & Add-Ons
- Sea Salt Flakes or Crushed Nuts
- Extra Salty Crunch: Sprinkling sea salt flakes over the freshly dipped chips can bring out the chocolate’s sweetness even more.
- Nutty Texture: Finely crushed peanuts, almonds, or hazelnuts add a pleasant crunch and depth of flavor—just ensure no one in your group has a nut allergy!
- Sprinkles & Candy Pieces
- Festive Sprinkles: Whether you choose rainbow sprinkles, holiday-colored options, or metallic pearls, they add a fun, decorative touch that’s perfect for parties.
- Crushed Cookies or Candy Bars: Try crumbling Oreo cookies or mini chocolate candies on top of the coating for an extra layer of indulgence.
Additional Coatings
- White Chocolate Drizzle
- Visual Contrast: A thin drizzle of white chocolate over dark- or milk-chocolate-coated chips not only looks elegant but also provides a creamy flavor accent.
- Easy Technique: Once your base chocolate has hardened, melt a small amount of white chocolate. Use a fork or squeeze bottle to create a striped pattern.
- Nut Butter Swirls
- Creamy Topping: Peanut butter, almond butter, or cashew butter can be heated gently to a pourable consistency, then drizzled over your finished chips.
- Flavor Pairings: Choose a chocolate base that complements your nut butter dark chocolate often pairs beautifully with peanut butter, for example.
Dietary-Friendly Variations
- Dairy-Free & Vegan Options
- Plant-Based Chocolate: Brands offering vegan-friendly chocolate bars or chips are widely available. Melt and dip them the same way you would regular chocolate.
- Baked or Low-Sodium Chips: If you’re trying to watch salt or fat intake, opt for baked chips. They still provide crispiness while adhering to your dietary goals.
- Sugar-Free Alternatives
- Low-Carb Chocolate: For those aiming to reduce sugar, look for chocolate sweetened with stevia or other sugar substitutes.
- Same Melting Method: These sugar-free chocolates usually melt similarly to standard chocolate, though you may need a bit more patience as some varieties can be temperamental under heat.
Chef’s Note:
I love playing around with toppings it’s one of the easiest ways to personalize this recipe. In my experience, even a small pinch of a new seasoning can make a familiar snack feel brand-new. So don’t be afraid to get creative and make it your own!. If you want another chocolate-dipped option for inspiration, try our Chocolate Covered Almonds recipe, which showcases how versatile chocolate coatings can be.
With these flavor variations and toppings in mind, you’ll have no shortage of inspiration for turning ordinary potato chips into a show-stopping treat. Next, we’ll delve into how best to serve and store your chocolate covered chips, ensuring they stay fresh (and Instagram-worthy!) until they’re all gone.
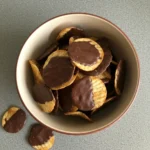
Serving & Storage
Once your chocolate covered chips have fully set, it’s time to enjoy and, if necessary, store them for later. Whether you’re serving a crowd at a party or simply savoring them as a personal treat, a little attention to presentation and proper storage can significantly elevate the overall experience.
Presentation Tips
- Plating & Display
- Contrasting Colors: Consider pairing the dark-brown chocolate chips with a light-colored serving dish. White platters or bowls help the chocolate pops visually, especially if you’ve added decorative drizzles or toppings.
- Mix and Match: Serve a variety of chip styles (kettle-cooked, ridged, and thin-cut) on a single tray for a fun, eclectic presentation. Guests can sample different textures to find their favorite.
- Pairings for Added Flair
- Dessert Combinations: For a sweet ending, arrange the chips alongside fresh fruit, ice cream, or even bite-sized brownies. The salty crunch offers a nice contrast to other sweets.
- Beverage Suggestions: A tall glass of cold milk, a creamy latte, or a refreshing cup of tea are great ways to balance the richness of chocolate covered chips. If you’re looking for a more luxurious treat, consider a caramel or vanilla-flavored latte.
Storage Guidelines
- Airtight Containers
- Preventing Moisture: Once your chips are set, transfer them to a clean, airtight container. Moisture is the enemy of crispness, so ensure there’s no excess humidity inside.
- Layering Tip: If you’re stacking multiple layers, separate them with parchment or wax paper to prevent sticking or smudging.
- Refrigeration & Freezing
- Short-Term Storage (2–3 Days): If your home or serving area is warm, refrigerate the chips to keep the chocolate from melting or blooming. However, be aware that condensation can form when moving them back to room temperature, which could affect crispness.
- Long-Term Storage (Up to 2 Weeks): For extended freshness, place the container in the freezer. Thaw them gently in the fridge before serving to minimize temperature shock this helps maintain both flavor and texture.
- Shelf Life Considerations
- Type of Chocolate: Dark chocolate tends to have a slightly longer shelf life compared to milk or white chocolate. Nonetheless, aim to consume your chocolate covered chips within a couple of weeks for maximum taste and texture.
- Checking for Freshness: If chips become stale or if the chocolate develops any off odor or taste, it’s best to err on the side of caution and discard them.
Chef’s Note:
In my experience, chocolate covered chips rarely last long enough to worry about elaborate storage solutions they tend to disappear fast! But if you’re preparing for a special event or simply saving leftovers, these guidelines will help you keep them fresh and delicious for as long as possible.
With these serving suggestions and storage tips, you’re all set to delight friends, family, and most importantly your own taste buds.
Enjoy every crunch of this sweet-and-salty masterpiece!
PrintChocolate Covered Chips
Chocolate covered chips bring together the perfect balance of salty crunch and sweet decadence, making for an easy, homemade treat that satisfies every craving.
- Prep Time: 10 minutes
- Cook Time: 5 minutes
- Total Time: 15 minutes
- Yield: 4 servings 1x
- Category: Snack
- Cuisine: American
Ingredients
Main Ingredients
- 2 cups potato chips (Preferably ridged or kettle-cooked for extra crunch)
- 1 cup chocolate chips (Milk, dark, or white chocolate)
Optional Toppings
- sea salt flakes (For extra contrast)
- crushed nuts (Almonds, peanuts, or hazelnuts)
- white chocolate drizzle (For a decorative touch)
Instructions
- Line a baking sheet with parchment paper and set aside.
- In a double boiler or microwave, melt the chocolate chips until smooth, stirring occasionally.
- Dip each potato chip halfway into the melted chocolate, allowing excess to drip off.
- Place dipped chips on the prepared baking sheet and sprinkle with sea salt, nuts, or drizzle with white chocolate if desired.
- Let the chocolate set at room temperature or refrigerate for 10-15 minutes until firm.
- Enjoy immediately or store in an airtight container for up to 3 days.
Notes
For the best results, use high-quality chocolate and sturdy chips to prevent breakage. Experiment with different toppings for a unique twist!
Nutrition
- Calories: 250
- Sugar: 18
- Sodium: 180
- Fat: 14
- Saturated Fat: 7
- Carbohydrates: 30
- Fiber: 2
- Protein: 3
- Cholesterol: 5
Conclusion
Chocolate covered chips bring together the perfect balance of salty crunch and sweet decadence, proving that sometimes the simplest combinations yield the most delightful results. By selecting high-quality ingredients choosing sturdy chips and the type of chocolate that best suits your taste and paying attention to techniques like even melting and proper storage, you can create a truly gourmet-style snack in the comfort of your own kitchen.
In my experience, these treats rarely last long because they’re just that good. They also make a fantastic party snack, conversation starter, or a last-minute dessert to satisfy a craving. Whether you stick to a classic milk chocolate coating or experiment with toppings, the possibilities are endless. So go ahead treat yourself to the sweet-and-salty magic of chocolate covered chips, and don’t hesitate to share your own creative twists with friends, family, or in the comments below!
FAQs
Why did Lay’s stop making chocolate covered chips?
u003ca href=u0022https://gr.pinterest.com/recipesunfolded/u0022u003eLay’su003c/au003e introduced their Wavy Milk Chocolate Covered Potato Chips as a limited-edition holiday offering. While they generated buzz, they weren’t intended as a permanent fixture in the Lay’s lineup. Frito-Lay has never officially stated a specific reason for discontinuing them, but typically, seasonal or limited-run products either end due to limited demand, production costs, or to make room for new offerings.
How to make chocolate coated chips?
Making chocolate coated chips is simple:u003cbru003eu003cstrongu003ePrep the Chips u0026amp; Chocolate:u003c/strongu003e Use sturdy potato chips (kettle-cooked or ridged) and chop your choice of chocolate into small pieces.u003cbru003eu003cstrongu003eMelt the Chocolate:u003c/strongu003e Heat the chocolate gently either in a double boiler or in the microwave in short bursts until smooth.u003cbru003eu003cstrongu003eDip u0026amp; Cool:u003c/strongu003e Dip each chip halfway, shake off excess chocolate, and place it on a parchment-lined tray. Let the chocolate set at room temperature or in the fridge.
Are chocolate covered nuts a healthy snack?
Chocolate covered nuts can be part of a balanced diet when enjoyed in moderation. Nuts provide healthy fats, protein, and various vitamins and minerals. However, the added chocolate (especially milk chocolate or sweetened chocolate) contributes sugar and calories. Opting for dark chocolate with a higher cocoa percentage (and less sugar) is a slightly healthier choice.
Who invented chocolate-covered potato chips?
The exact origin isn’t entirely clear, but Widman’s Candy in North Dakota is often cited as an early pioneer, popularizing what they call “Chippers.” While there may be other claims, Widman’s dates back to the early 20th century, making it one of the earliest known confectioners to combine potato chips with chocolate.
u003cstrongu003eShould you coat chocolate chips in flour?u003c/strongu003e
Coating chocolate chips in flour is a trick sometimes used in baking like when making cookies or cakes to keep chips from sinking in batter. For melting chocolate chips or making chocolate-covered treats, there’s no need to coat them in flour. In fact, it can interfere with achieving a smooth chocolate texture.