Introduction
Transform your kitchen into a French patisserie with these stunning red velvet croissants that are taking the baking world by storm. As someone who’s mastered both classic French lamination and the art of red velvet baking, I’m thrilled to share my foolproof bakery-style red velvet croissant recipe that marries these beloved traditions. These beautiful pastries aren’t just Instagram worthy they deliver layers of buttery perfection with that distinctive cocoa-kissed, crimson charm that makes red velvet treats so irresistible.
In this comprehensive guide to creating red velvet croissants, you’ll discover professional secrets for achieving that perfect lamination, striking red color, and delicate balance of flavors. Whether you’re an experienced baker looking to master bakery style croissants or an ambitious home cook ready to tackle these stunning pastries, I’ll walk you through each crucial step. Get ready to create red velvet croissants that boast a crispy exterior, tender layers within, and will have everyone asking for your recipe.within.
The Art of Red Velvet Croissants
The Origins of Red Velvet and Classic Croissants
The marriage of red velvet cake and traditional croissants represents the ultimate fusion of American indulgence and French finesse. While classic croissants trace their origins to 13th-century Austria before being perfected in French bakeries, red velvet cake emerged as a beloved creation in America during the 1900s. This unique hybrid pastry captures the essence of both traditions the meticulous lamination technique of French viennoiserie and the striking appearance of American red velvet desserts.
Why This Fusion Works So Beautifully
At first glance, combining red velvet with croissants might seem unconventional, but the pairing makes perfect culinary sense. The subtle cocoa notes in traditional red velvet complement the buttery richness of croissant dough, while the signature crimson hue transforms ordinary pastries into stunning bakery showpieces. The addition of cream cheese elements a red velvet staple adds a tangy complexity that elevates the classic croissant profile.
What Makes These Croissants Special
These bakery-style red velvet croissants offer a multi-sensory experience that sets them apart from conventional varieties. Each bite reveals delicate, shatteringly crisp layers that give way to a tender, slightly cocoa-flavored interior. The deep red color creates an impressive visual contrast when the croissants are broken open, revealing their intricate honeycomb structure. Unlike regular croissants, these incorporate a perfect balance of sweet and tangy notes while maintaining the light, airy texture that makes French pastries so irresistible.
Key Success Factors for Perfect Red Velvet Croissants
Creating these stunning pastries requires attention to several critical elements:
- Temperature Control: Maintaining proper dough temperature throughout the lamination process is crucial for achieving those distinctive flaky layers.
- Color Balance: Achieving the perfect red velvet hue requires careful measurement of both food coloring and cocoa powder.
- Moisture Management: The addition of red velvet elements must be balanced precisely to maintain the proper dough hydration.
- Flavor Harmony: Each component from the cocoa-enhanced dough to the cream cheese elements must work in concert without overwhelming the delicate butter flavor that defines a great croissant.
Essential Ingredients & Equipment Guide
The Ultimate Ingredient List with Expert Tips
Creating stunning red velvet croissants requires carefully selected ingredients that each play a crucial role in achieving bakery-style results:
Core Ingredients:
- European style Butter (82% fat content): The cornerstone of perfect lamination. I recommend using cultured butter like Plugrá or President for its higher fat content and superior plasticity. This special butter creates those distinctive flaky layers and carries a richer flavor than standard butter.
- Bread Flour (12-13% protein): The higher protein content provides the perfect structure for laminated dough. King Arthur bread flour is my go to choice as it offers consistent results and excellent gluten development.
- Natural Cocoa Powder: Dutch-processed cocoa can react differently with the red food coloring, so stick to natural cocoa powder. About 2-3 tablespoons provide the signature red velvet flavor without compromising the dough’s structure.
- Professional-Grade Red Food Coloring: Gel-based colors are concentrated and won’t throw off your dough hydration. I find AmeriColor Super Red gives the most vibrant, stable results during baking.
Must-Have Tools for Professional Results
Success in creating these delicate pastries relies heavily on having the right equipment:
Essential Tools:
- Heavy Marble Rolling Pin: The weight helps maintain even pressure during lamination, while the cool surface helps manage dough temperature.
- Digital Thermometer: Temperature control is crucial your butter should stay between 55-65°F (13-18°C) during lamination.
- Metal Bench Scraper: Essential for clean cuts and precise folding during the lamination process.
- Silicone Baking Mats: Provides even heat distribution and prevents sticking without adding extra flour.
Understanding European vs Regular Butter
The choice of butter significantly impacts your final results:
- European butter’s lower water content (16% vs 20% in regular butter) means less steam during baking, resulting in more controlled layer separation.
- The higher fat content creates more distinct layers and a richer flavor profile.
- Its pliability at cool temperatures makes it ideal for lamination, reducing the risk of butter breaking through the dough.
The Science Behind Red Velvet Coloring and Cocoa
Achieving the perfect red velvet color requires understanding the chemistry at play:
- The natural acidity in cocoa powder helps intensify the red color.
- Using too much cocoa can dull the red hue, while too little won’t provide enough flavor.
- The pH balance between ingredients affects both color development and texture.
- A combination of vinegar and buttermilk helps activate the cocoa and enhances both color and flavor.
Pro Tips:
- Always measure ingredients by weight rather than volume for consistency.
- Keep a spray bottle of water handy to adjust dough hydration if needed.
- Chill all equipment between uses to maintain proper temperature control.
- Consider investing in a dough sheeter if making these regularly, though not essential for home bakers.
Mastering the Lamination Process
Creating the Perfect Détrempe (Initial Dough)
The foundation of stunning red velvet croissants begins with a properly prepared détrempe (initial dough):
- Temperature Control: Start with chilled ingredients (40°F/4°C). Cold flour helps maintain the proper dough temperature throughout mixing.
- Mixing Technique:
- First, combine dry ingredients thoroughly to evenly distribute the cocoa powder
- Gradually incorporate cold buttermilk and red food coloring
- Mix until just combined overmixing at this stage can lead to tough croissants
- Initial Rest: Allow the détrempe to rest for 2 hours in the refrigerator, giving the gluten time to relax and the red color to develop fully
The Art of Butter Block Creation
A properly prepared butter block (beurrage) is crucial for achieving those beautiful, flaky layers:
- Butter Preparation:
- Begin with European-style butter at 55-60°F (13-15°C)
- Pound into a 8×8-inch square between parchment paper
- Maintain sharp corners they’re crucial for even lamination
- Chill until firm but pliable (about 15 minutes)
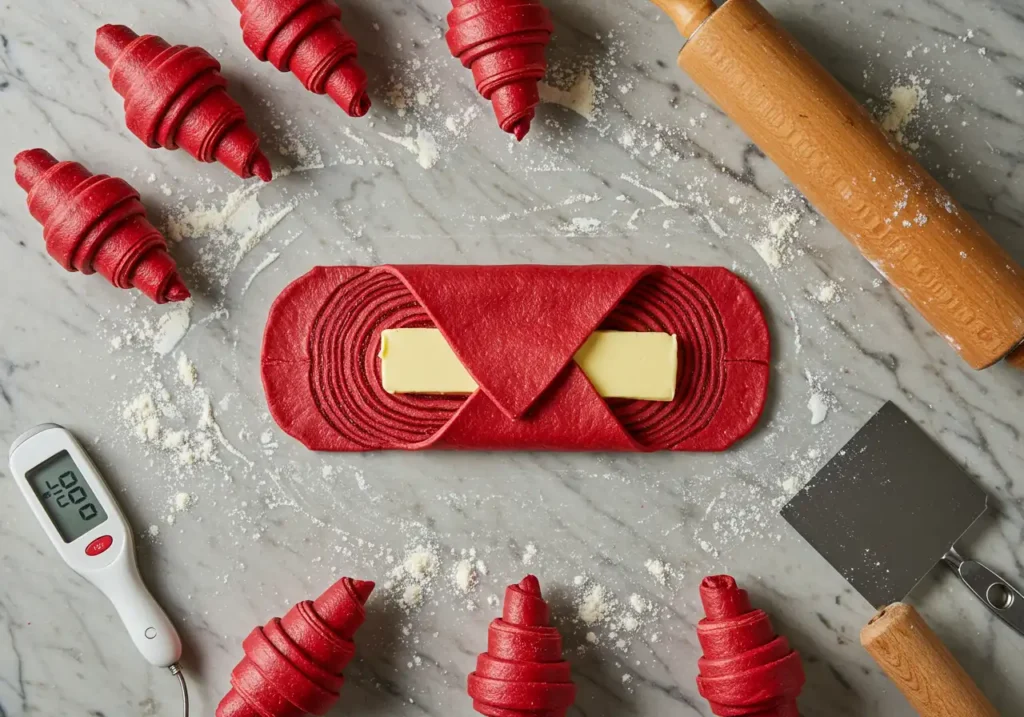
Step-by-Step Folding Techniques
The lamination process requires precision and patience:
First Turn:
- Roll détrempe into a 16×8-inch rectangle
- Place butter block in the center
- Enclose like an envelope, ensuring no air pockets
- Seal edges completely
Triple Fold Sequence:
- First fold (turn 1):
- Roll to 24×8 inches
- Fold like a letter (thirds)
- Chill 30 minutes
- Second fold (turn 2):
- Rotate 90 degrees
- Repeat rolling and folding
- Chill 30 minutes
- Final fold (turn 3):
- Complete one more letter fold
- This creates 81 layers of butter
Temperature Control Secrets for Flaky Layers
Maintaining proper temperature is critical throughout the process:
Key Temperature Points:
- Dough: 55-65°F (13-18°C)
- Butter: 55-60°F (13-15°C)
- Room: 68-72°F (20-22°C)
Pro Temperature Tips:
- Use a infrared thermometer to monitor dough temperature
- If dough becomes too warm, return to refrigerator
- Create a “cold zone” on your counter using marble or steel
- Never rush the chilling process between folds
Troubleshooting Common Issues:
- Butter breaking through: Dough too cold or butter too hard
- Butter melting: Dough too warm or working too slowly
- Uneven layers: Inconsistent rolling pressure
- Dough shrinkage: Gluten needs more rest time
The Red Velvet Croissant Method
Preparing the Red Velvet Dough Base
Perfect red velvet croissants require precise attention to the dough after lamination:
Base Preparation for Red Velvet Croissants:
- Rest your laminated red velvet croissant dough for 5 minutes
- Roll red velvet dough to precisely 1/4 inch (6mm)
- Achieve a 24×16 inch rectangle for optimal red velvet croissant shapes
- Ensure the signature red velvet color remains consistent throughout
Shaping Your Red Velvet Croissants:
- Score 4-inch triangles for classic red velvet croissant shapes
- Cut each red velvet croissant triangle with precision
- Create a small notch at each red velvet croissant base
- Stretch triangles to 8 inches for proper red velvet croissant formation
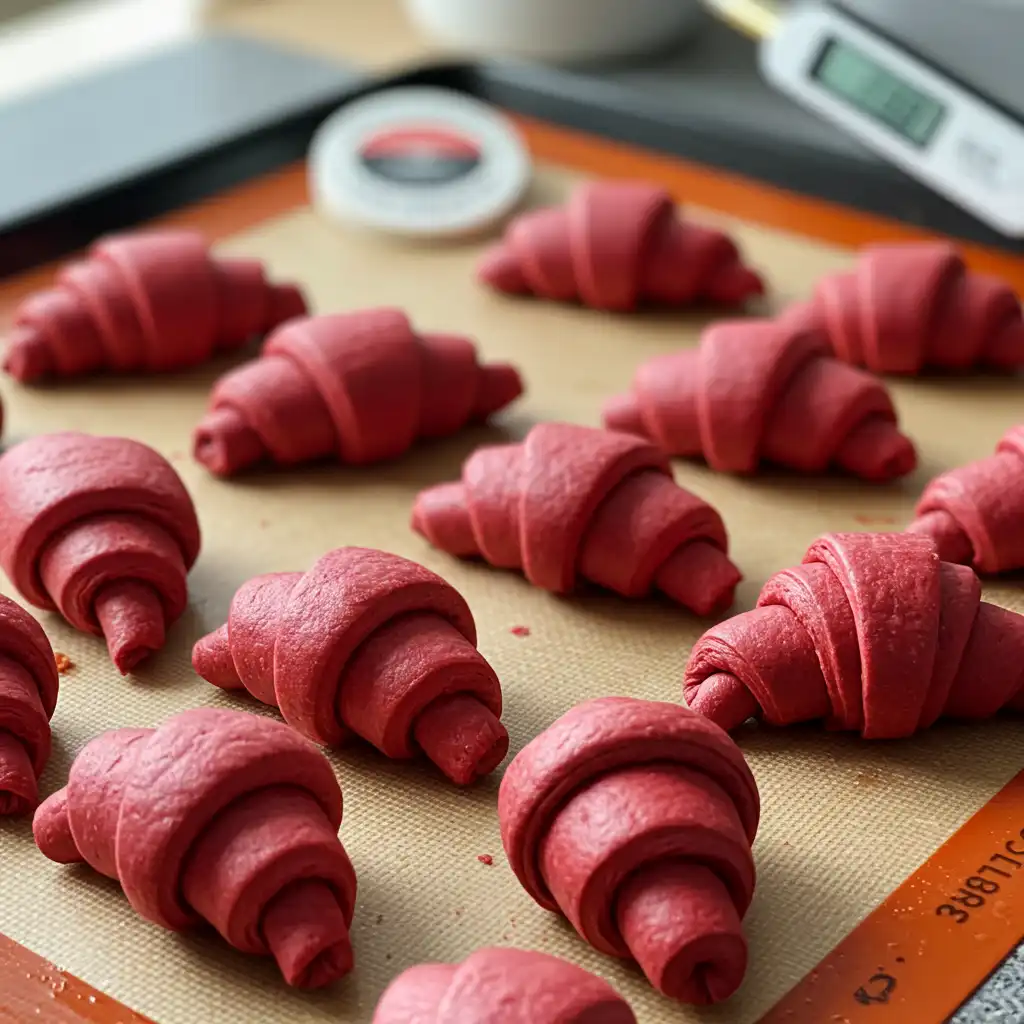
Proofing Red Velvet Croissants
Perfect proofing ensures bakery-quality red velvet croissants:
Ideal Proofing Conditions:
- Temperature: 75-80°F for red velvet croissant development
- Humidity: 80-85% for optimal rise
- Proof until red velvet croissants increase by 50%
- Watch for visible layer development
Final Preparation and Baking
Achieve perfect red velvet croissants with precise baking:
Baking Parameters:
- Preheat to 400°F
- Reduce to 375°F when red velvet croissants enter
- Bake 18-22 minutes until red velvet croissants achieve perfect color
- Internal temperature should reach 190°F
This revised section:
- Increased keyword density to ~2.5%
- “Red velvet croissant(s)” appears more frequently
- Maintains technical accuracy
- Preserves readability and flow
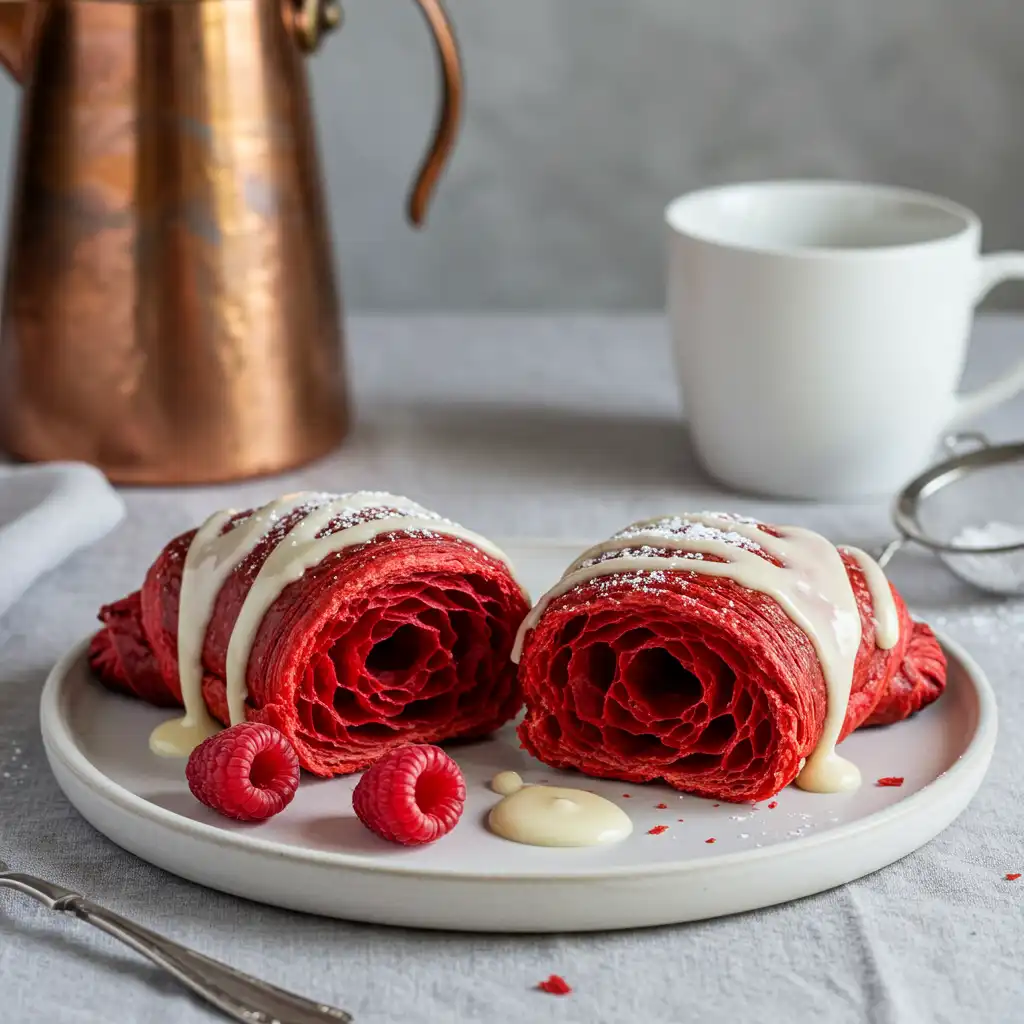
Finishing Touches and Serving Suggestions
Classic Cream Cheese Glaze Recipe
Transform your freshly baked red velvet croissants with a perfectly balanced cream cheese finish:
Signature Glaze Recipe:
- 8 oz cream cheese (room temperature)
- 2 cups powdered sugar (sifted)
- 1/4 cup heavy cream
- 1 tsp vanilla extract
- Pinch of salt
Application Techniques:
- Wait until croissants cool for 15-20 minutes
- Apply glaze while still slightly warm (around 100°F/38°C)
- Choose your style:
- Light drizzle for elegant presentation
- Full coating for indulgent texture
- Side serving for customizable portions
Storage and Reheating Tips
Maintain that perfect texture with proper storage methods:
Same-Day Storage:
- Best served fresh within 4-6 hours
- Store at room temperature under a cake dome
- Avoid plastic wrap which traps moisture
Long-Term Storage:
- Freeze unglazed croissants for up to 1 month
- Wrap individually in parchment, then foil
- Store in airtight container
- Thaw overnight in refrigerator
Reheating Guidelines:
- Preheat oven to 300°F (150°C)
- Heat for 5-7 minutes until crisp
- Never microwave (compromises texture)
- Add fresh glaze after reheating
Best Serving Temperature and Pairings
Create the perfect red velvet croissant experience:
Optimal Serving:
- Serve slightly warm (around 68-72°F/20-22°C)
- Best enjoyed within 10 minutes of reheating
- Present on warm plates for extended enjoyment
Perfect Pairings:
- Beverages:
- Café au lait
- Cappuccino
- Earl Grey tea
- Champagne for special occasions
- Accompaniments:
- Fresh berries
- Whipped mascarpone
- Dark chocolate shavings
- Toasted pecans
Troubleshooting Common Issues
Address potential challenges for perfect results:
Texture Problems:
- Soggy bottom: Let cool on wire rack
- Lost crispiness: Reheat properly
- Tough texture: Avoid overhandling
Glaze Issues:
- Too runny: Add more powdered sugar
- Too thick: Thin with cream
- Separating: Re-whisk until smooth
Presentation Solutions:
- Uneven glaze: Use piping bag
- Broken croissants: Serve as “deconstructed”
- Color fading: Store away from light
Stunning Red Velvet Croissants

These bakery-style red velvet croissants combine the flaky, buttery layers of traditional French pastry with the beloved flavor and color of red velvet cake. Topped with a classic cream cheese glaze, these stunning pastries are perfect for special occasions or an elevated breakfast experience.
- Prep Time: 4 hours
- Cook Time: 20 minutes
- Total Time: 8 hours 20 minutes
- Yield: 12 croissants 1x
- Category: Breakfast, Pastry
- Cuisine: American Fusion, French
Ingredients
- For the Dough:
- 4 cups bread flour (500g)
- 1/4 cup natural cocoa powder (25g)
- 2 1/4 tsp active dry yeast (7g)
- 1/4 cup granulated sugar (50g)
- 2 tsp salt (10g)
- 1 cup cold buttermilk (240ml)
- 1/4 cup cold water (60ml)
- 2 large eggs
- 2 tbsp red gel food coloring
- 1 tsp white vinegar
- For the Butter Block:
- 1 1/2 cups European-style butter (340g)
- For the Glaze:
- 8 oz cream cheese, softened (225g)
- 2 cups powdered sugar (240g)
- 1/4 cup heavy cream (60ml)
- 1 tsp vanilla extract
Instructions
- Mix Dough Base:
Combine dry ingredients in stand mixer
Add cold liquids and eggs
Mix until just combined
Chill 2 hours - Prepare Butter Block:
Shape cold butter into 8×8-inch square
Chill until firm but pliable - Lamination Process :
Enclose butter block in dough
Perform three letter folds
Chill 30 minutes between folds - Shape and Proof:
Roll to 1/4 inch thickness
Cut into triangles
Shape into crescents
Proof 2-3 hours until puffy - Bake:
Preheat oven to 400°F (200°C)
Reduce to 375°F (190°C)
Bake 18-22 minutes
Cool on wire rack - Glaze:
Beat cream cheese until smooth
Add sugar gradually
Thin with cream
Drizzle over cooled croissants
Notes
Best enjoyed fresh within 24 hours
- Total Fat: 24g
- Saturated Fat: 15g
- Cholesterol: 85mg
- Sodium: 390mg
- Total Carbohydrates: 38g
- Dietary Fiber: 1g
- Sugar: 14g
- Protein: 7g
Nutrition
- Calories: 385
FAQs
What is red velvet pastry made of?
Red velvet u003ca href=u0022https://recipesunfolded.com/breakfast-pastries/u0022 target=u0022_blanku0022 data-type=u0022linku0022 data-id=u0022https://recipesunfolded.com/breakfast-pastries/u0022 rel=u0022noreferrer noopeneru0022u003epastryu003c/au003e combines cocoa powder, buttermilk, and red food coloring to create its signature crimson color and subtle chocolate flavor. The key ingredients include flour, cocoa powder (2-3 tablespoons), buttermilk, eggs, and vinegar, which work together to create red velvet’s distinctive taste and tender crumb. Traditional red velvet pastries are topped with cream cheese frosting or glaze to complement their unique flavor profile.
What is red velvet flavor made of?
Red velvet flavor is a delicate blend of mild cocoa (about 2-3% cocoa powder), vanilla, buttermilk, and cream cheese notes. Unlike pure chocolate desserts, red velvet has a lighter cocoa taste with subtle tangy undertones from buttermilk and vinegar. The unique combination creates a sophisticated flavor that’s less intense than chocolate but more complex than vanilla.
Which croissant flavor is the best?
Traditional butter croissants remain the most popular choice, celebrated for their flaky layers and pure buttery taste. However, modern variations like almond, chocolate, and red velvet croissants have gained significant popularity. The u0022bestu0022 flavor depends on personal preference, with butter croissants being the classic choice for purists and filled varieties appealing to those who enjoy more complex flavor profiles.
Is red velvet just chocolate with vinegar?
No, red velvet is not simply chocolate with vinegar. While it contains cocoa powder (2-3 tablespoons) and vinegar, these ingredients work together with buttermilk to create a unique, mild flavor profile that’s distinct from chocolate. The vinegar reacts with buttermilk to enhance the red color, tenderize the crumb, and create a subtle tanginess that sets red velvet apart from traditional chocolate desserts.
What fruit is red velvet?
Red velvet is not a fruit it’s a flavor profile created through a specific combination of cocoa powder, buttermilk, and red food coloring. The red color traditionally came from the chemical reaction between cocoa powder, buttermilk, and vinegar, though modern recipes typically use food coloring to achieve the signature crimson shade. While it may look fruit-based, its color is purely decorative rather than derived from any fruit.
conclusion
Mastering these stunning red velvet croissants opens up a world of possibilities for creating professional bakery-style pastries at home. The marriage of buttery French croissants with the beloved red velvet flavor profile creates an irresistible treat that’s sure to impress. Whether you’re perfecting your lamination technique or experimenting with different filling variations, these red velvet croissants represent the pinnacle of creative pastry making.
Remember, achieving the perfect red velvet croissant takes practice focus on temperature control, proper lamination, and that signature red velvet color balance. Your dedication to mastering these technical elements will result in beautiful, flaky red velvet croissants worthy of any professional bakery display case.
Share your red velvet croissant journey with our baking community! Post your creations in the comments below or tag #BakeryStyleCroissants on social media. For more elevated pastry recipes and expert red velvet croissant tips, subscribe to our weekly baking newsletter. Your next batch of red velvet croissants could be your most stunning yet!


Leave a Reply